
Full confession: for the longest time I have hated doing FDM 3D printing. I am primarily into miniature gaming and painting, so I am really focused on painting my prints after they are done. With FDM you get layer lines all over, which causes all kinds of problems when painting the prints.
I have tried getting into FDM for printing terrain, but have never really been happy with the print quality nor the printing process, and the machines have been too expensive for what they did. I have just stuck with buying the best resin 3D Printers for miniatures and printing on them.
But times are changing. Newer types of FDM 3D printers are coming out, looking to eliminate pain points instead of just trying to be cheap. This means solid auto leveling, working out of the box (there is a crazy thought) and in general, just trying to make the user experience better. Also, printing speed is getting fashionable. This is great news for people looking to get into FDM printing!
The Anycubic Kobra 2 3D printer is a machine that follows this trend: it wants to be easy to use, work out of the box but it also wants to be fast. In my Anycubic Kobra 2 review, I will look at how well this little printer achieves this.
I will go through my experience setting up the Anycubic Kobra 2, using it out of the box, and trying to fine-tune it for detailed terrain. My angle will be how it will handle from the perspective of a beginner getting into FDM 3D printing terrain and other pieces for gaming (be it skirmish games, Dungeons and Dragons, tokens or what have you).
In the end, I will compare the Kobra 2 3D printer to other similar FDM printers you might want to check out before you buy anything. Up front I can say: it is not my pick for the best 3D printer for terrain.
Anycubic Kobra 2 at a Glance
| Spec | Detail |
|---|---|
| Type | FDM (filament) 3D printer |
| Build Volume | 222 × 222 × 250 mm |
| Max Print Speed | 300 mm/s (150 mm/s default) |
| Auto Leveling | LeviQ 2.0 — works reliably out of the box |
| Optimal Layer Height | 0.2 mm (PLA, stock settings) |
| Hardware | Steel wheels, improved cooling, dual-gear extruder, rigid frame |
| Best for | Beginners getting into fast FDM printing for terrain & props |
| Price (typical) | ~$259 — Check current price → |
Anycubic Kobra 2: Pros and Cons
| ✓ Pros | ✗ Cons |
|---|---|
|
|
Bottom line: The Anycubic Kobra 2 is a solid value pick if you want a fast FDM printer that works out of the box for PLA terrain. The hardware is genuinely good for the price — the let-down is the user experience around fine-tuning. If your only ambition is to print terrain and props at 0.2 mm layer height, the Kobra 2 will do the job and not break the bank. Full review and test prints below.
Review Copy Disclosure
Anycubic sent me this printer for review. I have agreed to review this printer, but I have promised Anycubic nothing more than that. No money has changed hands and Anycubic does not get to approve this article before it is published.
You can read more about our Review Copy Policy Here (TLDR: I take this stuff very seriously)
Affiliate Link Disclosure
Age of Miniatures is reader-supported. When you buy through links on our site, we may earn an affiliate commission. Learn more about that here.
What to look for in a good FDM 3D Printer for Terrain and other Hobby tasks
Ease of use features
FDM 3D printing can be brutal. Having to fight your 3D printer to get it to do what you want is not fun. Get one that helps you instead with auto bed leveling and other beginner-friendly features.
Balance of Speed and Print Quality
The speed of the printer can be super important to you, or it can matter very little. The quality of the prints can be super important to you, or it can matter very little. Often times speed will come at the expense of quality (but it is not always the case). Find the right balance for you.
Noisy or Silent?
Cheap 3D printers will often use cheap fans. Cheap fans are often extremely loud. The sound from the movement of the FDM 3D printer can also be extremely noisy. If you are going to sit next to your FDM printer, get something with a volume you can tolerate. Speed is often noisy.
Lifetime and quality of components
FDM printers are made up of so many small mechanical parts, which all have an impact on how it runs. A cheap printer will cost you troubleshooting time instead of money. The parts will also degrade quicker. That might be worth it for some, but not me.
A quick overview of the Anycubic Kobra 2
The Anycubic Kobra 2 is a small-sized FDM printer from Anycubic. It prints on a bed that is 222x222mm and at a 250mm height, so not suited for big terrain stuff ( you can squeeze a house in, but not much more than that). The Kobra 2 is one of Anycubic’s entry-level FDM 3D printer, but that mainly means that the form factor is small and you get a good “bang for your buck”. Expect to pay about $260 for it if you buy directly from the Anycubic store (mostly the cheapest option). It will fall in price as new generations come out.
The stock settings will default to a maximum printing speed of 150 mm/s at 0.2mm layer height. You can go a little faster if you go 0.3 layer height, but the test prints I did with it (and the test that came with the printer) was not having amazing quality. For terrain and detail, 0.2mm is the bare minimum.
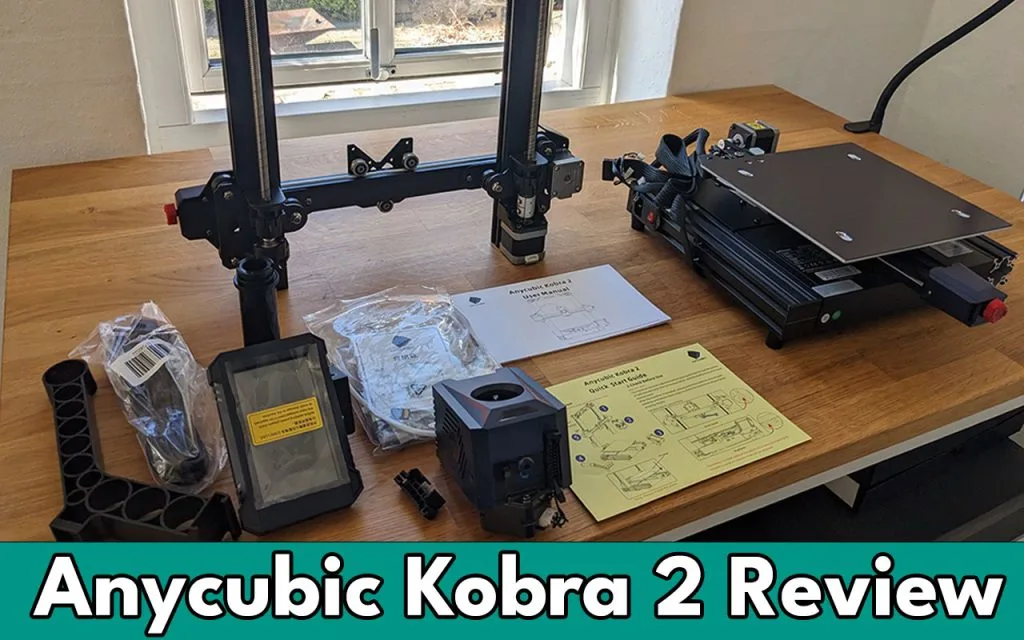
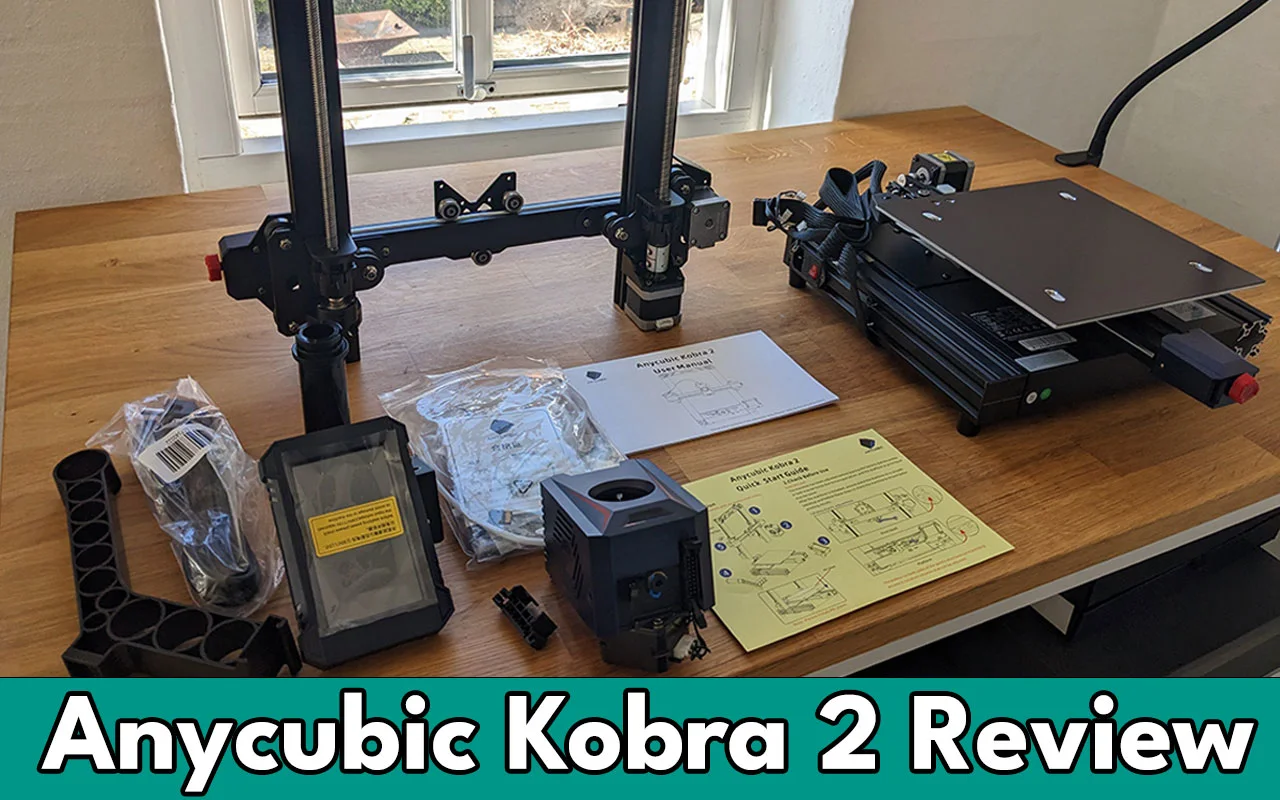
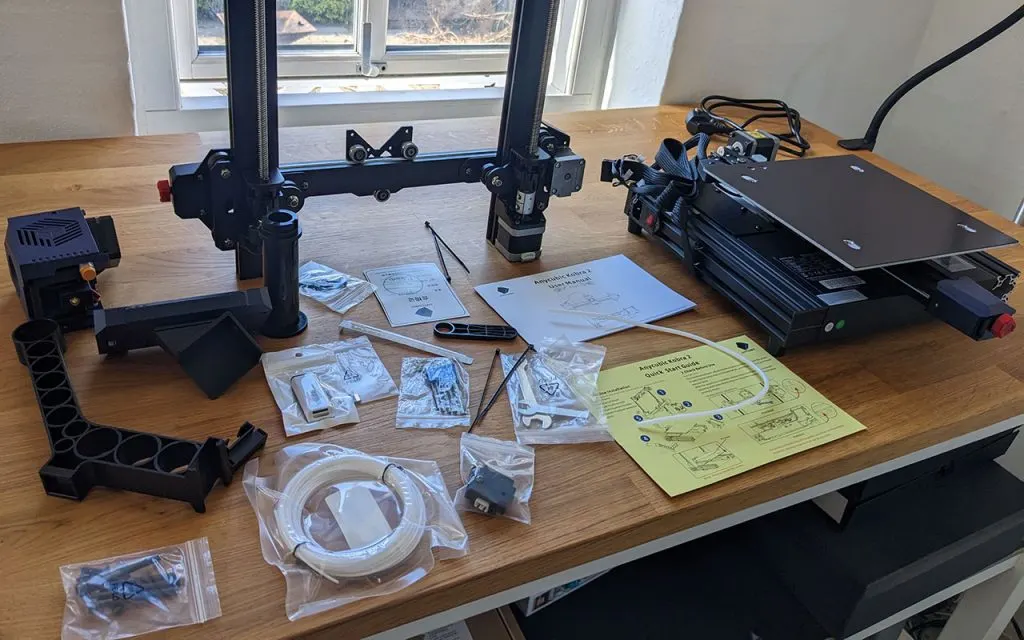
The machine is well-designed and easy to assemble and set up. It comes in the following parts:
- Base
- Frame
- Print head
- Touch screen
- and a filament holder
Very few screws are required and the manual does a good enough job telling you what is up and down. My machine came without any major issues from the start, but know that this will not always be the case. Things can happen in shipping and sometimes you get shipped a “potato”.
It has a LeviQ 2.0 auto-leveling system with an inductive sensor and the leveling is actually “auto” and not a print bed mesh leveling assistant to your manual leveling process. There are no knobs to tighten or ways to adjust the print bed, so it is all auto. This is the type of thing you will mostly see on very expensive FDM printers, and it is a breath of fresh air to see it coming for cheaper machines. It works okay, but I also found that it had some drawbacks.
The Kobra 2 has a direct drive extruder and a rapid cooling system, which will mainly mean something to you if you plan to print with materials more exotic than PLA (you can print PLA easily and in theory ABS, PETG or TPU on it). The print bed has a flexible PEI magnetic with texture on it, which grips the material really well. Things stick on this baby. It also has a filament run out sensor, stopping your print if you have run out of filament (while cool, I advise against relying on the filament sensor that much).
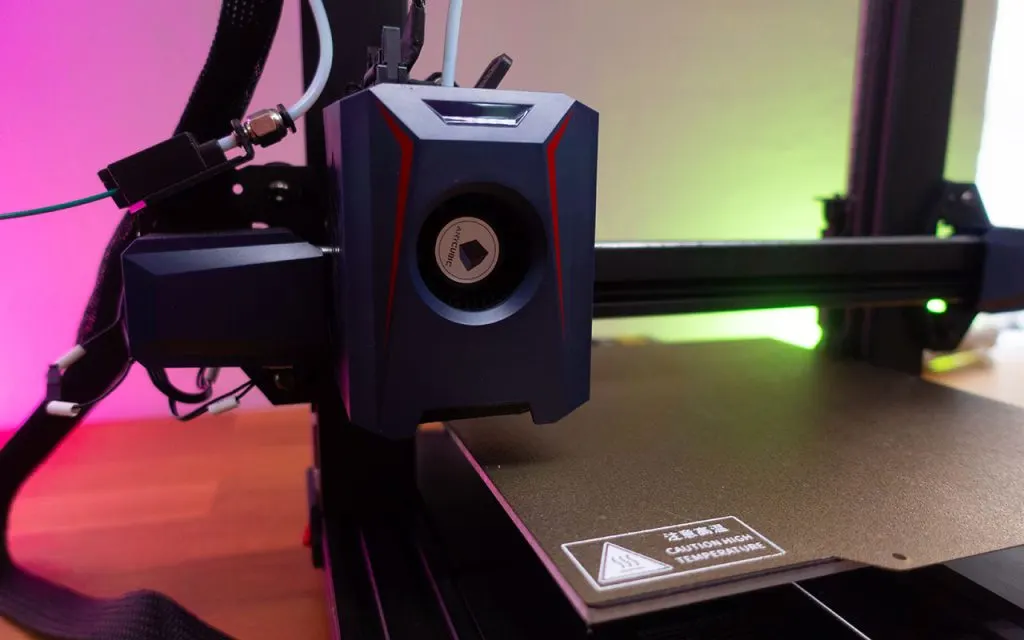
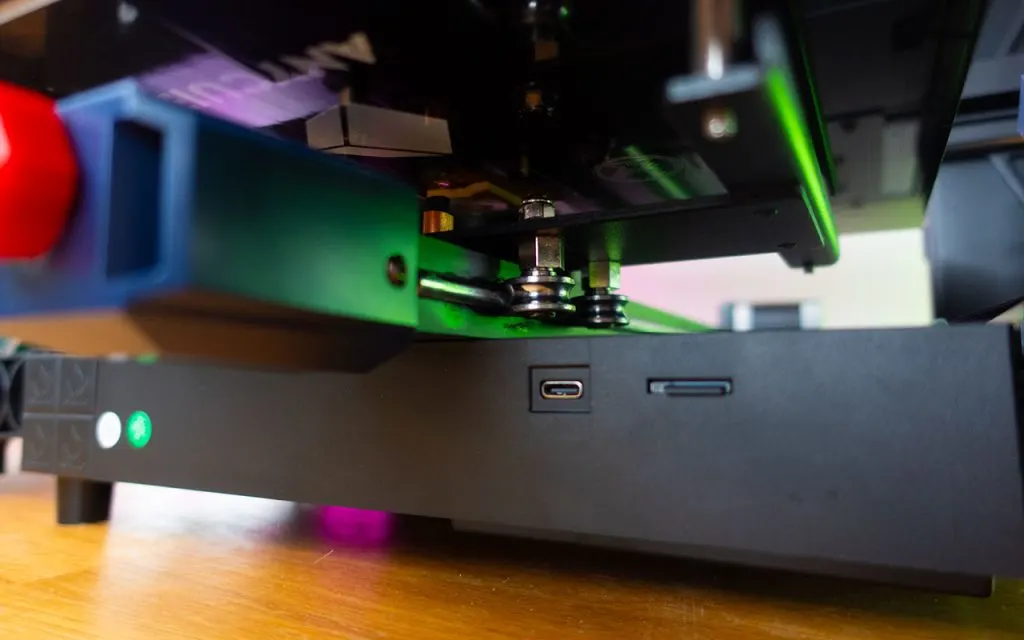
The Anycubic Kobra 2 3D printer has a small LCD touchscreen with a pretty bare bones UI and controls. The spool holder sits on the left of the machine and has a filament runout sensor. The machine takes up a lot more space because of the left-angled spool holder. You print via a MicroSD card that comes with the machine. You can plug the machine into your computer via a USB-C port on it.
The frame is very rigid and overall the construction is solid. There is no real Z-wobble at the top of the frame and everything seems very sturdy. Some improvements have been made to the way the bed moves and other parts of the 3D printer to make it able to print fast without sacrificing speed. Having a good construction and well-made parts are extremely important when printing at high speed.
While the moving parts of the machines are somewhat silent at low speed, they are very audible at the default speed of 150 mm/seconds. It makes some crazy sounds when the printer moves the bed or the print head at high speeds. I have tried loosening/tightening and greasing everything. No luck. I expect the sound to be the wheels of the bed making a funky squeaking sound.
Anycubic claims a silent 30db fan, which might be the case for the internal fans. This is pretty meaningless feature, because the fan on the print head is much louder and overall the printer makes a lot of noise. While I can sit a few meters away from it and work, I need my trusty noise-canceling Sony Headphones to be able to tolerate it. It is pretty bad.
So why is this printer exciting and why am I making this Anycubic Kobra 2 review?
Well, from my perspective I want something I can in good faith recommend as a good FDM printer for beginners that want to print terrain. So far, I have never found a cheap FDM printer that I would recommend anyone else to get. I hope that changes with the Kobra 2 3D printer.
For the longest time FDM 3D printing has been a race to the bottom. Manufacturers have competed to make the cheapest FDM 3D printers possible (read: Ender 3 clones). This has meant that RND resources have gone into that, instead of figuring out how to create a better user experience or how to improve the print quality.
Thankfully, this is changing. It all sort of started with the Bambu Lab Kickstarter and the success of their X1 printer. Suddenly manufacturers realized that ease of use and speed would be something that could sell units.
This means that Creality, Elegoo, and Anycubuic have begun to copy that style. We see it with the bedslingers Anycubic Kobra 2 and the Elegoo Neptune 4, but especially with the Core XY K1 from Creality.
Not only are we getting FDM 3D printers that are easier to use, but we are also getting printers that can print significantly faster than older versions. This move has only really begun, and it is likely that we see significant improvements from generation to generation. Buyer beware.
My quick take on the Anycubic Kobra 2
Right now the Anycubic Kobra 2 sits in a pretty good spot. It is a budget/midrange 3D printer with a small form factor but it adds speed and easy-to-use system out of the box. While I expect this kind of printer to be a dime of dozen in the not-so-long future, as of writing the Anycubic Kobra 2 is a good buy. A value pick for the person who wants to get into FDM 3D printing with something that works out of the box. I found it work, but I also found it to be fickle to fine tune for detail.
As soon as a new Kobra, Neptune or other similar printer comes out you might wish you have waited for the “next gen”. But that is how it is with this kind of tech, the best time to buy is always the next generation.
I was quite skeptical of the Kobra 2 not having any way of manually adjusting the bed. Turns out, it worked super well. For this fact alone the Kobra 2 is an easy recommendation for a beginner into FDM printing. You plug it in, let the machine calibrate itself, and print. That is if you are intending to use PLA at 0.2mm layer height with the stock settings. If you want to do anything else, you are on your own (or get help from the web). This is a missed opportunity from Anycubic, as it would be easy to handhold beginners even more with various presets and guides. But alas, this is not the case.
The Anycubic Kobra 2 is fast and it has the required hardware upgrades (steel wheels, improved cooling, and frame) to make it work without a big sacrifice to quality. Yeah, if you run the same print at 0.2mm but change the speed from the default 150 mm/s to say 50 mm/s, you will see some improvement in quality. But it is small jump, so depending on what you print and what it is used for that sacrifice can be worth it.
The bed texture has been much better than I had hoped for. The prints stick well and I did not feel the need to change it for something better, which is otherwise a common thing for cheap FDM printers to “mod”.
While I get that 3D printers are noisy, it is still a major drawback for me. I hope that we will see some strides in making 3D printers less annoying to sit beside in the future, but the Kobra 2 is not it. High speeds just mean a lot of noise right now.
While I could fit a miniature house on the build plate, for bigger prints, this machine is not it. Printing terrain in several pieces can be an option, but I find it extremely annoying. If you are like me, you might have to look for a machine with a bigger build plate. If the size is plenty for what you plan on, it does not matter.
Out of the box, it worked good. While there were some mishaps and artefacts on my speedy prints, they were not a big deal. If you just want to press play and print 0.2mm and get good enough quality and you do not want to spend a lot of money, the Kobra 2 might be for you.
When I wanted to do smaller layers, I needed to spend a lot of time getting the machine fine-tuned. I found that slowing the machine print down to 100 mm/s and adjusting other movement metrics helped in getting it to print smaller layers than 0.2mm. But it was not as easy as it should be, and the machine was not really helping me. The access you have via the touchscreen is fine for everyday use, but it is not really helping you when the bed is not perfectly aligned or you want to calibrate the e-steps.
All of that said I have enjoyed using the Kobra 2. And that is actually saying a lot. I have owned FDM printers that I wanted to throw out the window a lot, but that feeling was rare with the Kobra 2.
So the Kobra 2 gets my recommendation for a great “out of the box” experience for beginners wanting to print 0.2mm layer height prints at speed. It really performs well without too much fuss.

- Works out of the box pretty well
- Fast and precise for most needs
- Very budget-friendly
- Limited control of printer via UI and UX issues
- Extremely Noisy
- Limited build volume
- Questionable design decisions
My expectations for the Anycubic Kobra 2
While there is no doubt that resin is much better for detailed prints, it is not the best for big prints like a terrain piece.
- First of all, there is the cost of the resin. It is simply too expensive to print massive pieces. You can mitigate this somewhat by hollowing your prints, but if you have ever tried that, you know that it can come with some severe drawbacks.
- Resin is fragile unless you get a good resin. But sturdy resin costs a lot, so not the best option. If you are printing terrain, chances are someone else is also going to handle it. I would much rather have my gaming buddies throw around cheap PLA than cringe every time they do something stupid to my $50 immaculate resin mage tower.
On the face of it, FDM 3D printing is the clear solution. It also has a much simpler printing process and post-process (if everything works as it should), so could be a great gateway into printing for miniatures.
You can get cheap printers that can easily print PLA which is more than sturdy and a lot cheaper than resin. While not all printers can print a massive mountain, even on pretty small printers you can do some cool terrain.
The problem? Layer lines.
The standard layer lines of 200 microns (0.2mm) leave some very noticeable lines across the model. While looking at it is okay, it is so ugly when painted. On a terrain piece, you want to use quick paint techniques like drybrushing or speed paints. Both of these methods absolutely suck with layer lines, because the dry brush will pick up the lines and show them even more and the speed paints will sink into the pools. It looks unnatural and ruins any kind of joy I have with it.
The solution would be to print at lower layer heights like 0.04 or 0.08. That presents 2 main problems:
- The tolerances in cheap FDM printers are fine for something like 0.2mm lines. It is easy enough to get a good layer to stick and get a good print. When you go below it, you introduce a host of different problems (and it can actually reduce detail). If your printer bed is off by 0.06mm, that is mostly not a big problem when printing at 0.2 layer height. But when printing at 0.004 layer height? That is a margin of error that is suddenly way to big. You need to solve those problems by tuning your printer, but this is hard work and you will be fighting your machine a lot to make it do what you want. You have to account for correct e-steps, volumetric flow, retraction, and having an incredibly precise bed level and gantry. That creates an even bigger barrier of entry for beginners, so not a route I can recommend to go down (I have wasted too much time trying to get cheap printers fine tuned).
- Most of the time printing fast means you can get less detail. So to make it easier to print good detail on FDM you should go slower. But suddenly you have a heated bed and nozzle going for upwards of multiple days to get a print done. Depending on electricity prices, suddenly the economic calculations say the FDM printed terrain is not as cheap as we hoped. Also, when you have a failed print it can get catastrophic (so much wasted filament and hours).
So what do I want from an FDM printer to recommend for 3D printing terrain for complete beginners?
- To print out of the box without very little setup
- To have presets to be able to print very good detail with a minimum of fuss
- Ideally to be able to go fast, making printing at very low layer lines take less time than it otherwise would.
Getting something that is cheap and can do the above things have been… let us say a challenge.
I admit, I had low expectations for the Kobra 2. Not because I doubt that Anycubic could make something great, but because my faith in FDM printing has been smashed many times. I have found every FDM printer I have touched to be extremely fiddly. It seems that the tolerances have been largely set to be able to do 0.2mm at the lowest, and if you want to go lower than that it has required a massive amount of tinkering and mods. While that is cool for enthusiasts, for me it has just not been worth the time. No, I do not want my first 10 prints to be mods to make my printer to be able to print better. I just want it to work.
So while my expectations for the Kobra 2 were low, I still had hope (otherwise I would never have accepted the unit for review from Anycubic). I hoped that it would work out the box. I hoped that I could use the speed to print details faster than normal. I hoped it would not make a ton of noise. I hoped it would be something I could recommend for beginners.
I expected it to have massive issues out of the box and for the “auto leveling” to not really work (I have been burned before). I expected it to require a lot of work tinkering with it, if I wanted to go lower than 0.2mm layers. I expected it to be so noisy that I could not bear to be in the same room with it.
Assembly of the Anycubic Kobra 2 and build quality
Back in the days most FDM 3D printers were just a kit of parts that you had to put together. Thankfully, this is no longer the norm. The Kobra 2 comes disassembled in 5 parts that you have to put together.
Remember: my review is from the angle of a complete beginner. So manuals and ease of use really matter here.
The manual was okay at explaining assembly with images, but it could have been more clear with a bit of text. The gantry was lowered too much on mine out of the box, making it impossible to mount the head without moving it up and the manual says nothing about it. I did it by turning on the printer and making the printer move it, but a beginner might have forced it up by hand. They also forgot to mention where to insert the Y cable.
Other small gripes about manual and assembly:
- Wrong hole pictured for the filament run out sensor
- The PE cable image could be clearer
- The lettering on the cables is not very informative
- Telling you to “adjust the extrusion force”, but not how to do nor what it is.
Assembly was fine and if you think a little about what you are doing, it will work. But it still baffles me why it can be this hard to make a clear manual. Just get a random person to try and assemble and use the machine by only doing what it says in the manual. It will quickly become clear what you have missed and what needs more clarification. Neither Anycubic or Elegoo can figure this out and it is frustrating.
Before you power on you should check that the print head and bed sit firmly. Mine did, so no problem here. They do a poor job of explaining how when to loosen and tighten and how tight “tight” is.
The bed comes with a magnetic flexible PEI build plate. I love these magnetic flexible plates. The print sticks super well to the surface and is what I install on FDM printers as the first mod if they do not have it yet. Perfect plate for beginners. The plate here has this rough texture that makes the filament stick better, but it also means you will always have that textured feel to the bottom of your prints. The bendy and magnetic nature of the plate means you can take it off and flex it a bit, and your print will come off. Then you plop down the magnetic sheet down again on the base and you are ready for the next print.
I did not really find a need for removing the sheet and flexing it to get the prints off. When the bed is heated, the print sticks on super well. As soon as the bed is cooled down, I found that the print came off super easy.
The printer has a big QR on it, but all it does is kick you to the generic Anycubic help page. I could have gotten there without a QR code thanks. Maybe put a more useful URL there if you really want a QR code on it?
The printer assembled with only a few hiccups. It took me 32 minutes to unbox and be ready for printing.

It is overall a sturdy machine that will hold up to the speed of 150 mm/s. The build has a few with a few weird decisions. The spool holder is on the left side of the machine, and sits on in a janky and loose way. Why it is not on top is a weird decision, but there are threads so you could move it yourself. The power button is on the left side, so not easy to get to because of the spool holder. The slot for the microsd card on the front, but when the build plate is out it covers it up. As always, getting the micro SD card in and out is super jank and I would much rather use USB.
My Initial setup, Automatic leveling and test prints for the Anycubic Kobra 2 review
Now for the magic part: the auto bed leveling. I booted up the machine and the Anycubic beep sound came on. High pitch, super annoying. I searched around for a way to remove it via the UI on the touchscreen, but no luck. Made a mental note to find a hack to remove that stupid sound. Touchscreen feels okay. Not amazing, but whatever.
Fans inside the machine are on from the start, but not very noisy. But why are they on? Bad design.
The auto leveling actually worked. Well, sort off. The initial z-height it calculated was a bit off. When I went to manually adjust the z-offset on the touchscreen it moves in increments of 0.05mm. That is just awful in so many ways. While okay when tuning for a 0.2mm layer height it is fine, it is terrible for tuning in 0.08 or lower. Why this was decided on I have no idea. Sure, you can do some further z-offset in the slicer, but that is also kinda weird to have to do.
Funnily, if I ran the auto leveling over and over it would come to a slightly different conclusion of the right z-offset each time (so it is prone to small errors).
It might sound like I am a bit down on the auto-leveling system, but I am actually super impressed. I had expected it to not really work, but it worked out of the box and was printing fine looking prints. Having to manually adjust it one step up or down is no big deal and the margin of error is fine for 0.2 layers. The design of jumping the z-offset in 0.05 increments is just plain stupid, is the printer is perfectly capable of going in increments of 0.01. In other places of the UI you can enter a number, but you cannot do that on the z-offset screen. The reason I was a bit sad was because of the small mistakes it made and the trouble I had getting it absolutely perfect, which I knew would cause some issues when it came to printing lower than 0.2mm height (as you have less room for error there).
The auto leveling is slightly weird in the way it does it. For some reason the fan on the head kicks in when probing for the mesh, which I cannot fathom why it would do. The auto leveling did not really say if it was a success or not, but I know it tells you if it fails. You will can find the new z-offset in the menu and see if anything has changed to check if it did something.
The printer has this small pad it can wipe the nozzle on, which is super cool. But for some reason, it only wipes the nozzle on it when doing the bed level. Why it is not integrated into the start g-code is a beyond me. Wasted opportunity.
Inserting filament was fine, but could have been better. There is a button for pushing filament in and taking it out. But the button is on/off instead of being a set number of mm you extrude. A better experience would have been to control how many mm it should do, as that is also useful for doing e-steps calibration (and the printer is certainly capable of doing it, it is just a bad UI).
Speaking of the UI and touchscreen: they work, but not much more than that. If you just want to print out of the box it is fine, but once I wanted to calibrate the machine further, I quickly found I had to plug the printer into a PC via usb to get finer control over everything. Another example is the “preheat” function. You can either use their preheat profiles or enter your own, but you cannot set a new default. This meant that it is less useful than it could be.
Another example of poor UI is that while printing you can see elapsed time and and percentage done, how much time it has calculated that is left. Would be easy to implement, but alas.

I still hate the microSD card way of taking the print to the machine. Even though I disconnect the card in the right way, I still have issues where the card needs to be reformatted once in a while and the data on it is lost. Upgrade the card if that is an issue for you. I cannot wait for wifi connection to be standard (and work better than it does now). Also, I want the bed to end at the front of the printer when done, but when it is there it blocks the front insertion of the micro sd.
Test printing with the Anycubic Kobra 2: Print quality at high speed printing and stock settings
As I said, I was skeptical about the auto leveling and having no way of adjusting the bed. Would it give me a good print out of the box?
It actually worked. Some people have had issues where the sensor and the nozzle have become misaligned in shipping, so it is not certain that everything just works out of the box like mine did. But for me it did, and it worked better than printers I have spent 20+ hours fine-tuning. For me, that is a big win.
The test Benchy on the SD card that prints in 30 min is not printed at 0.2 layer height, but 0.28. It prints fast, but not really the quality I would like. The one with the stock settings and 0.2 layer height took more like 40 min. to print.
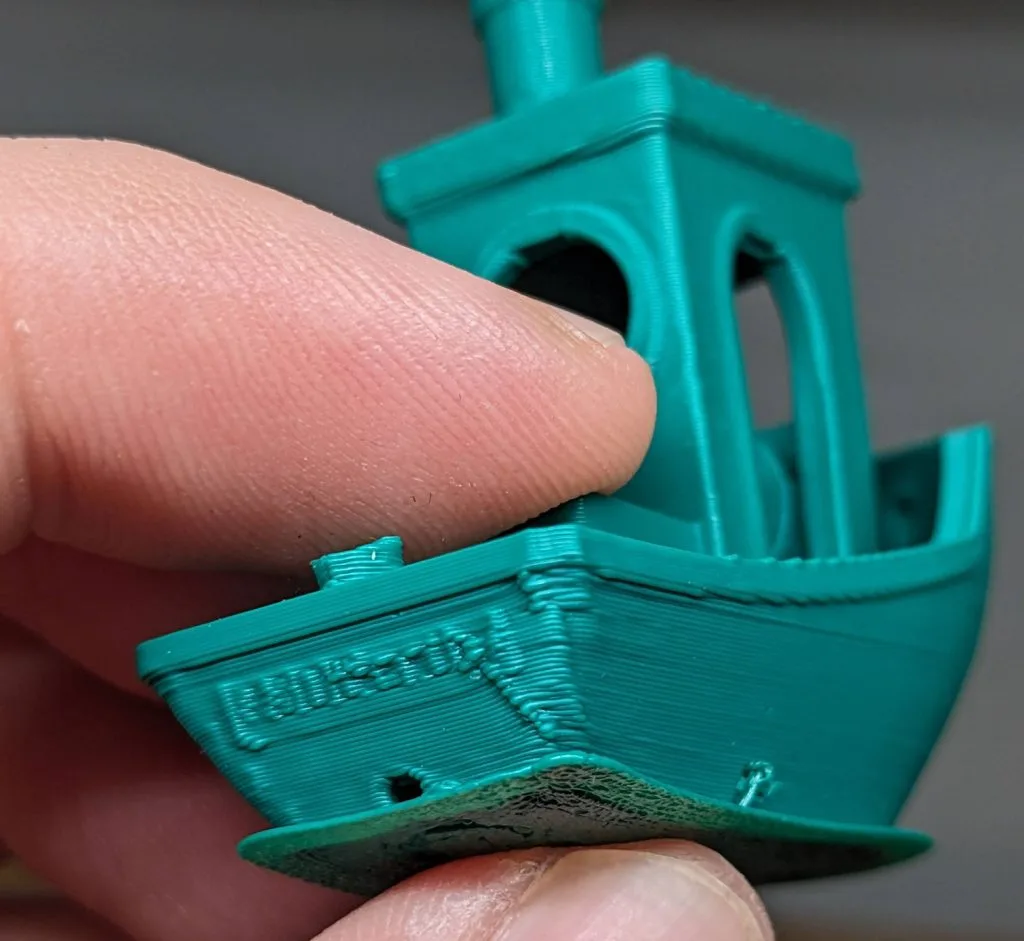
The Benchy shows a lot of signs of needing to fine tune the printer. Not only is the first layer not perfect, but there also might be something wrong with the e-steps and maybe som over extrusion issues.
But hey, it printed out of the box which is more than you can say for a lot of printer. That this sort of quality on the first go is sorta of a win is mainly a testament to how bad other printers have been tuned from the factory (and how much happens to them in shipping).
The magnetic PEI sheet did a super good job of holding onto the first layer, which I suspect is one of the reasons why the auto leveling can work (it has some leeway in how precise it needs to be if the first layer sticks very well regardless).
The Benchy shows a lot of signs of needing to fine tune the printer. Not only is the first layer not perfect, but there also might be something wrong with the e-steps and maybe som over extrusion issues.
But hey, it printed out of the box which is more than you can say for a lot of printer. That this sort of quality on the first go is sorta of a win is mainly a testament to how bad other printers have been tuned from the factory (and how much happens to them in shipping).
The magnetic PEI sheet did a super good job of holding onto the first layer, which I suspect is one of the reasons why the auto leveling can work (it has some leeway in how precise it needs to be if the first layer sticks very well regardless). I found the prints to be stuck super well when the bed was heated, but they come off easy when the bed is cooled down. That is the magic of PEI.
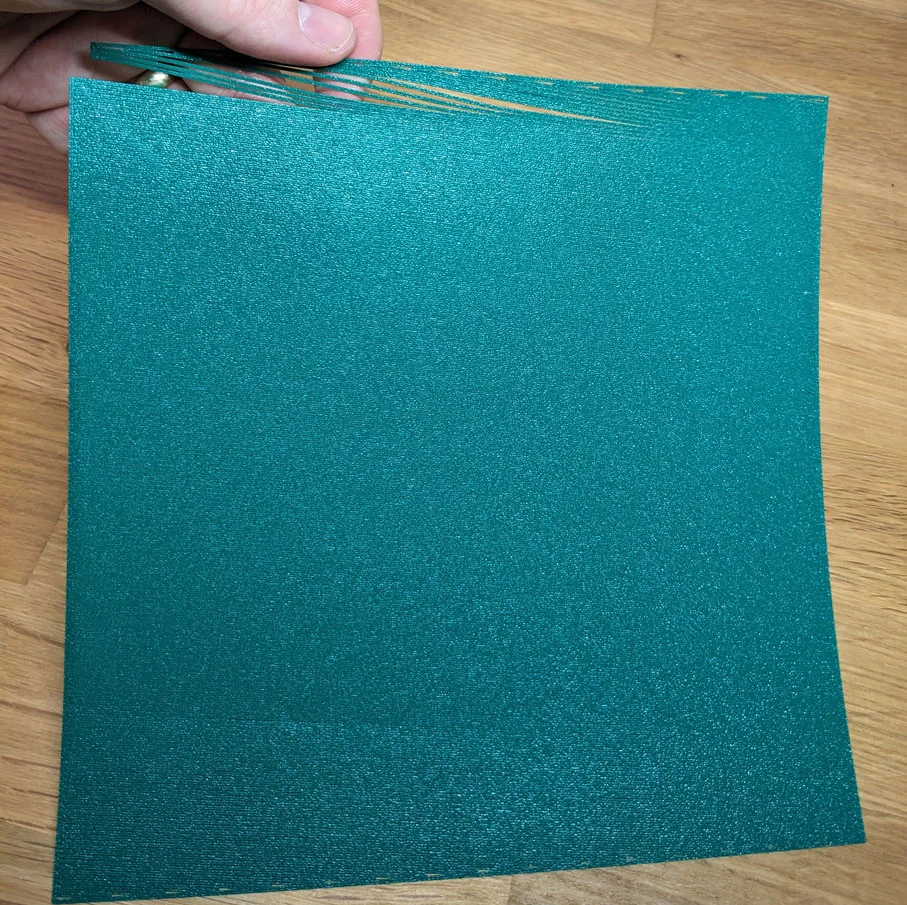
But I wanted to see where the issues were with the bed.
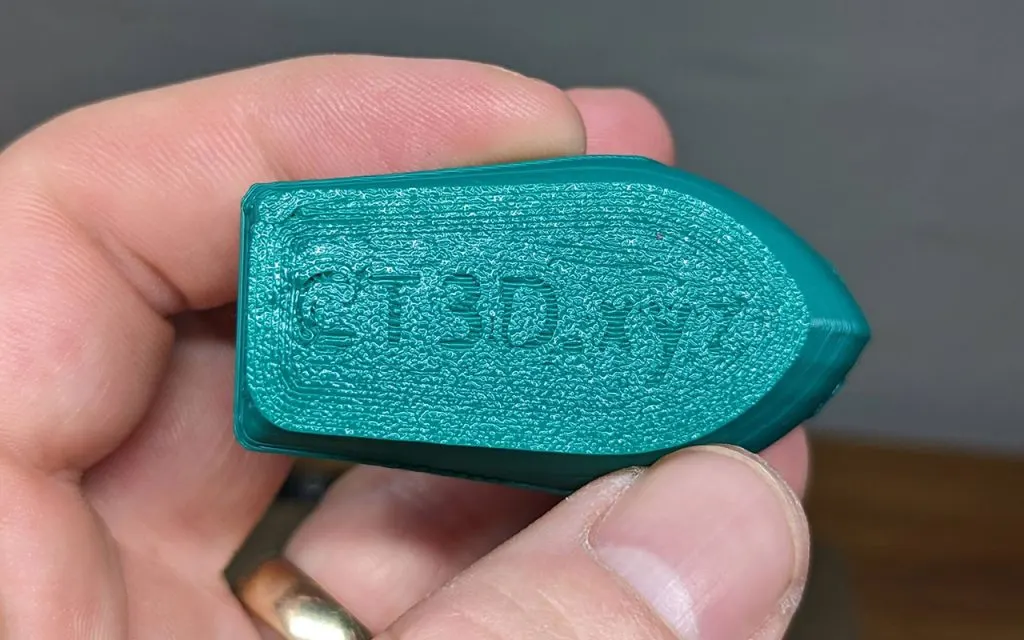
Testing a print of one layer on the whole of the plate also showed that z-height was correct on one side, but too low on the other. The mesh bed level did not do a good enough job of getting it just perfect (I later found out that I had a slight gantry sag, which caused this issue). Changing the z-offset by one increment changed it from too high to too low…

I tried a couple of prints after this, but with some horrendous fails. I tested with different filaments, different temps and tried adjusting the z-offset in the slicer. No luck.
I decided to get out my calipers to measure the printer. I have been burned before by believing things were level, when they actually were not. What I found was an issue with the gantry being off at about 0.05mm on one side. This coupled with the bed not being level did some funky things to my prints. I tightened things up and did seemed to work a bit better. Now there just was the issue of the bed not being perfectly level.
Sadly, the machine will not show you the numbers for the mesh of the bed it has calculated on the UI. It also will not let me extrude a specific amount of filament to measure if the E-steps were correct or not. So to tune this machine more, I had to connect it to my computer via the USB-C port and bot up a program. I used Pronterface.
Doing a bed level while in Pronterface gave me the measurements of the bed. I could put these into a website to get a measure of how the bed looked:
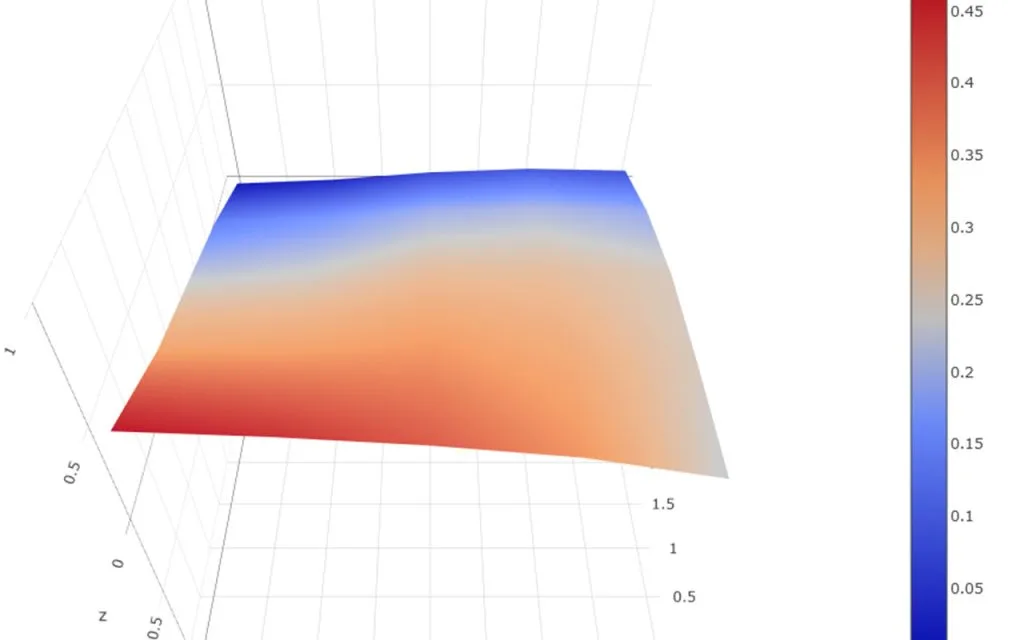
So the bed is by no means level, but my thought was that the bed mesh auto leveling should be able to compensate for this margin of error. But it seemed like it did not. I calculated the e-steps, and adjusted them a bit.
How the machine starts the print and ends the print (start g-code and end g-code) seems badly made out of the box. I made a note here to make my own version at some point and put it in the machine. The machine starts out by heating up to full temps, then it wipes from the back to front on the plate, then it squirts out a thick. not very long poop. at the front and then it goes for the print.
At the end, it moves the plate to the back of the machine.
The big poop it makes leaves a bit of filament on the nozzle when it goes to print and it seemed like it tried to push more filament out too quickly, leaving the very first part layer to have a gap. Sometimes the first layer also failed because the nozzle had a lot of gunk on it from the “purge” it tries to do.
All in all the start and end g-code are not well thought out and looks to be very standard and not made for this specific printer in mind.
I would much rather have it: wipe on the designed wipe pad, make two normal layers on the side, go for the print, and then end to the front. That is not hard to do Anycubic, so why leave it up the users to make it work?
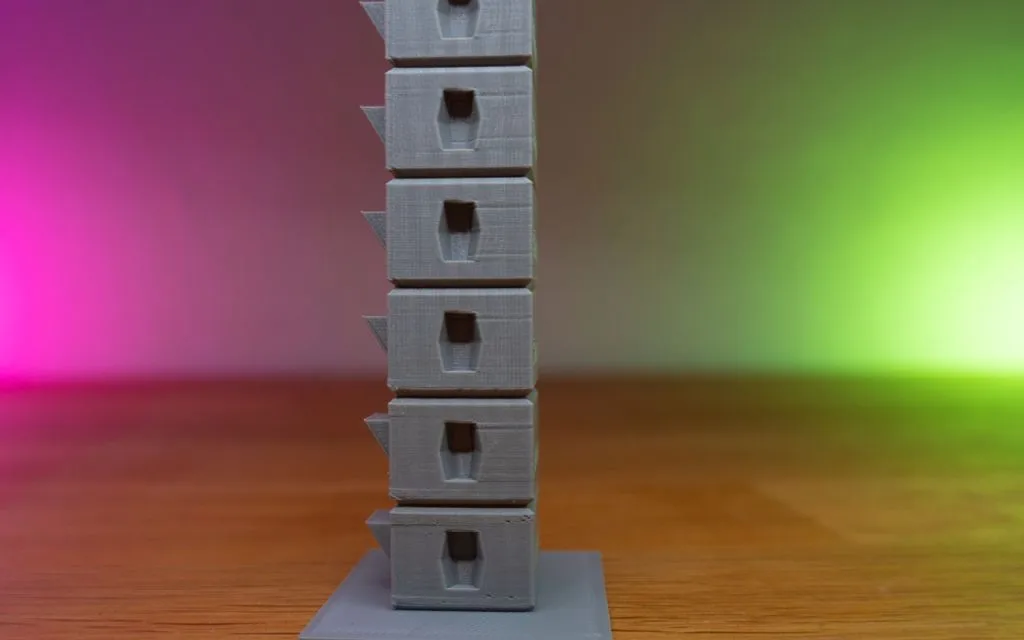
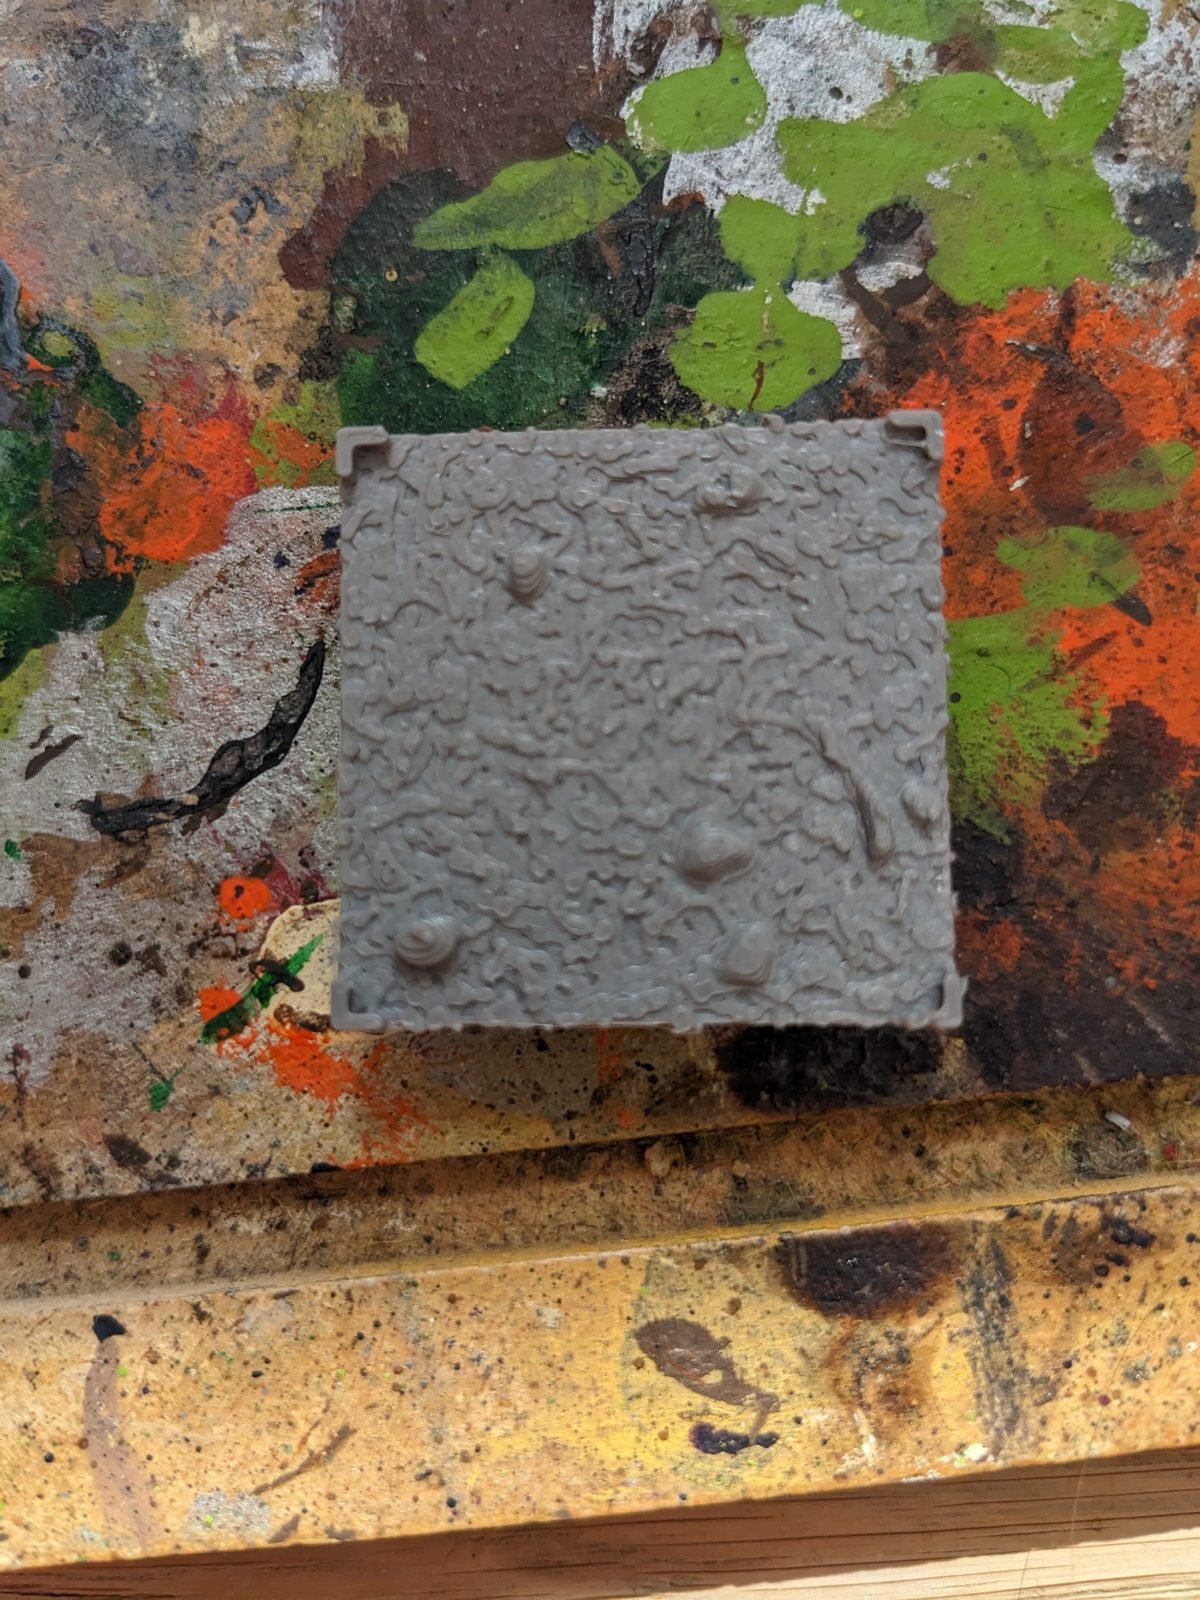
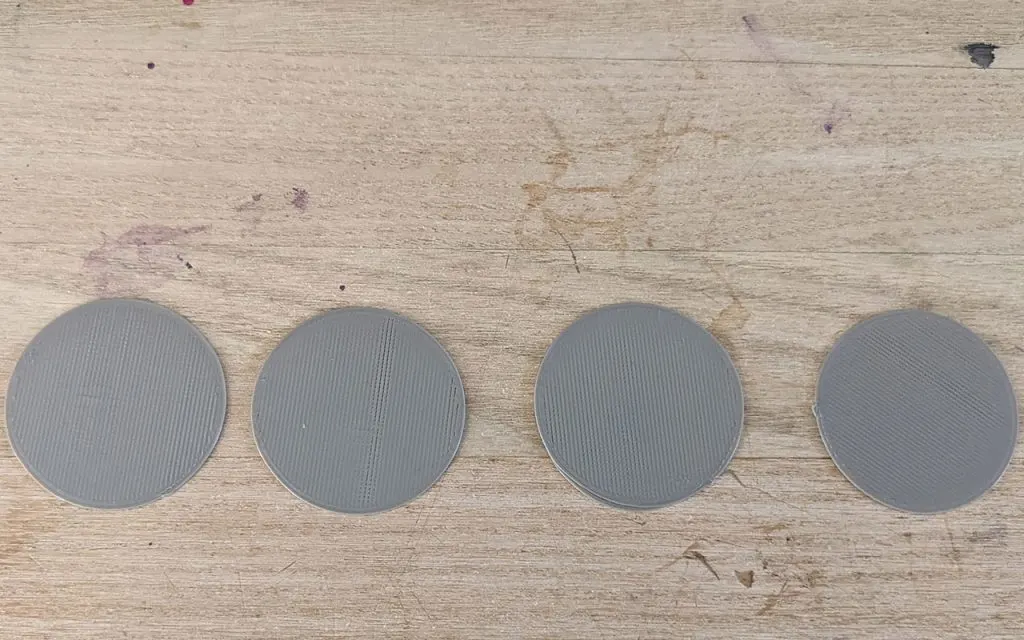
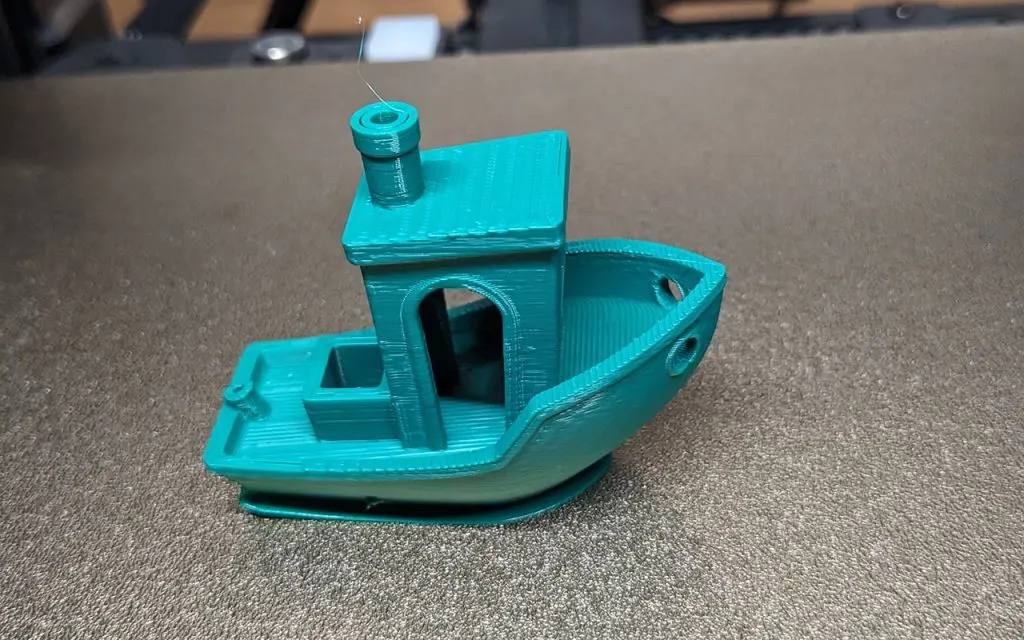
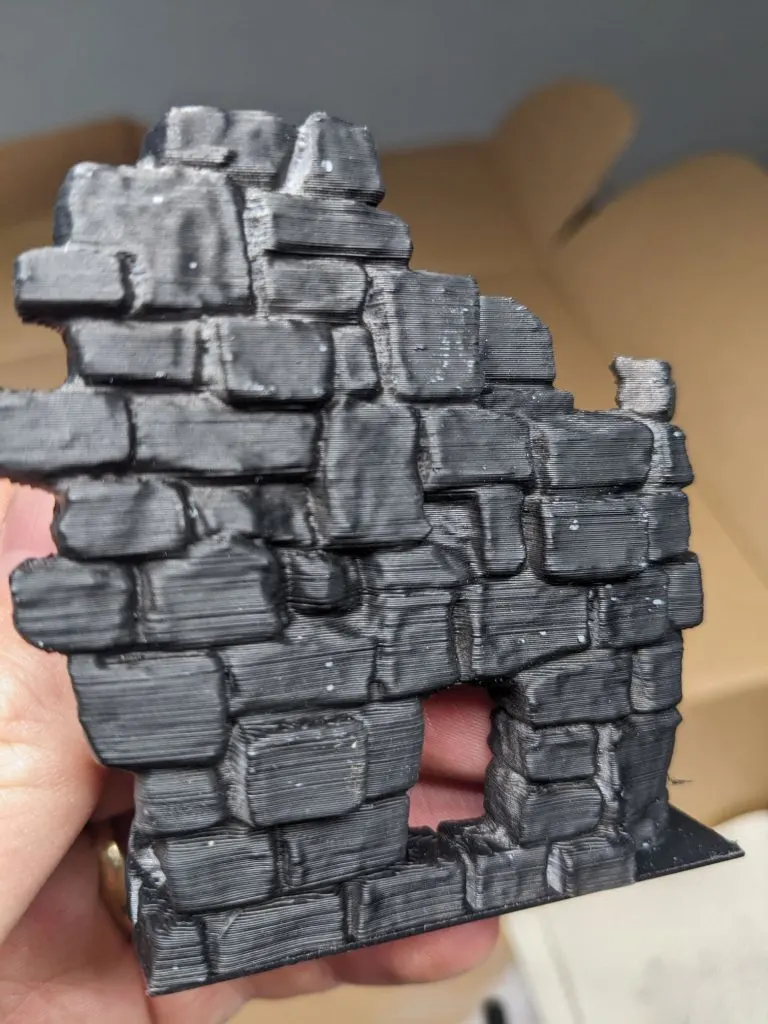
After much faffing about with tuning the printer and changing the start g-code to not make fails all the time, I got it to work good enough for 0.2mm layer height. I printed out some terrain (the whole purpose of this printer) and primed it black. Mainly I would see how much the layer lines where visible when painting it.
It looked, not great.

The layer lines show a lot and it looks unnatural when you paint it. Stones are not supposed to have those horizontal lines on them, so the whole thing just looks off. Even though I was not really up for more tuning of FDM printers, I knew I had to give it a shot to get to a lower layer height. But first, how was the out of box experience?
How is the out of box experience on the Anycubic Kobra 2
The out of box experience is okay. All the elements are there for a great printer, but I cannot help but feel that they are not coming together in the best of ways. The out of box experience is plagued by small issues with the presets, the bed leveling being slightly off and moving in too big increments, the start g-code being badly implemented and so on. They compound into a bigger issue that is not a great starting experience for new 3D printers. For veterans, it is no issue at all.
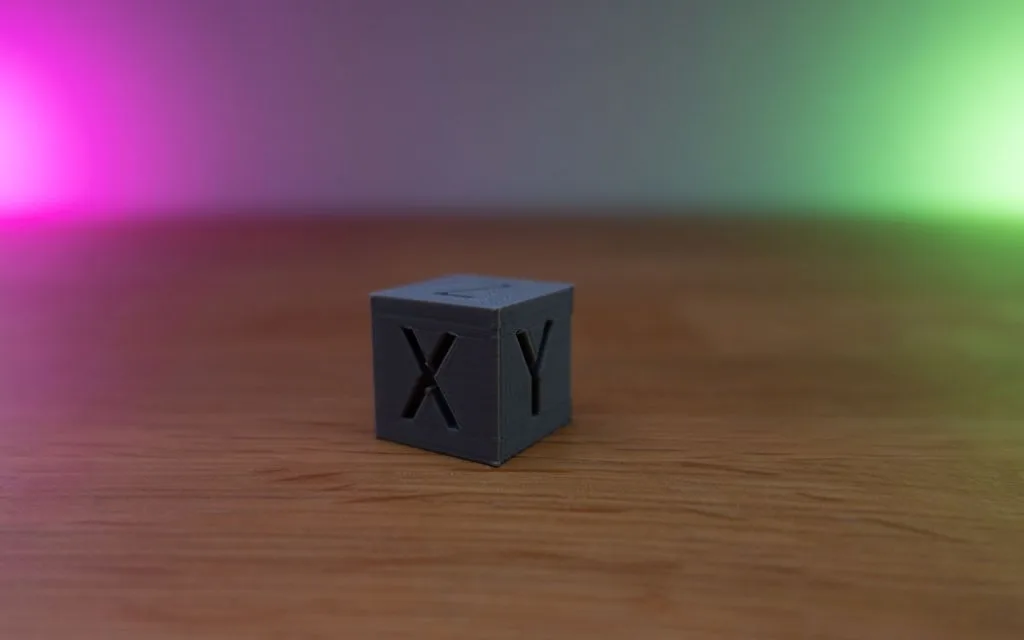
The printer also did well in testing how dimensionally accurate it was, which told me that it was actually calibrated rather well.
So, I want to see how the Kobra 2 could handle something closer to 0.08 or even 0.04.
Fine tuning the Kobra 2: this is where the printing process becomes hard
If you have a machine like this and a nozzle size of 0.4 (as is very standard), you are best of using layer heights that come in multiples of 0.04. A short explanation is that the stepper motors move in increments of 0.04, so it makes it easier to get good results. I wanted to go into full detail here and started out with a layer height of 0.04 to really test the machine.
It went bad. It was really really tricky to get the bed leveled for that because you have to be even more precise and there is very little margin of error. When the UI only goes up and down in increments of 0.05mm at a time, it gets really hard to get something dialed in for a 0.04mm heigh. Why not let me type it! I can type a number when it comes to preheat temps, why not here? Not a user friendly interface and a poor UX.
I then tried 0.08 mm layer height to give me some more room for error. I could get prints to stick, but still not a great first layer.

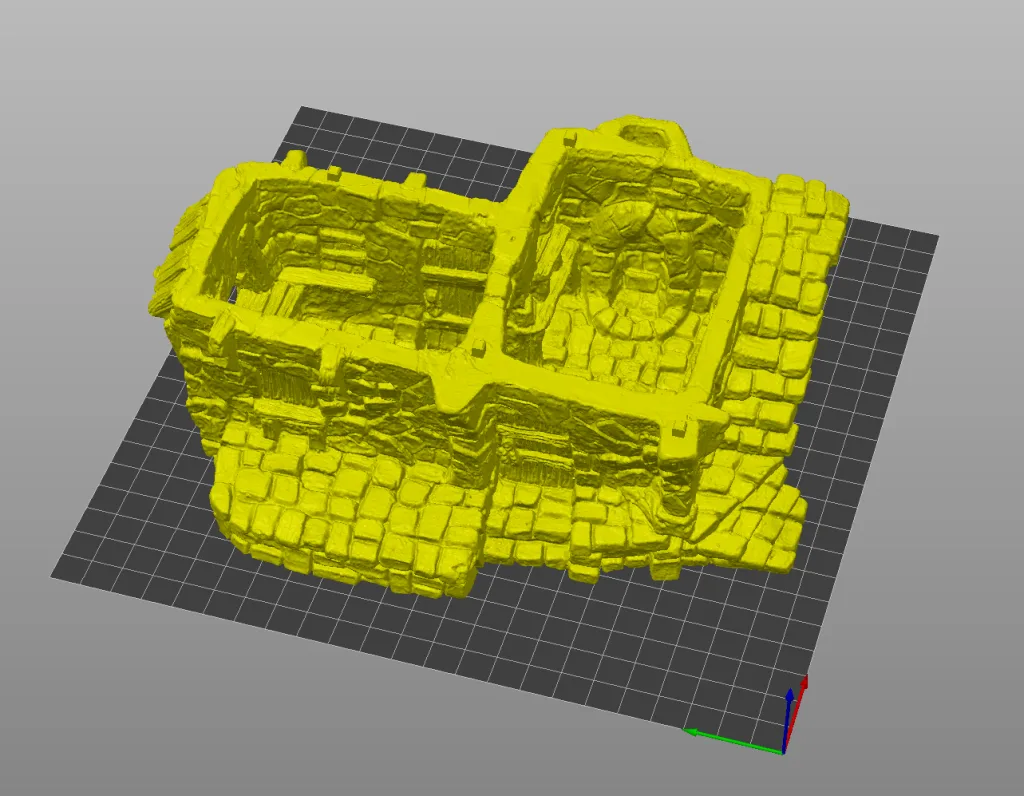
I also tried at a more average speed, and it went a little better. The issues with leveling and the gantry I could fix for a 0.2mm layer height, but when getting more precise than that it still wrecked the prints. The best prints I could get was with using Variable Layer Height in Prusa and then first using smaller layers when a very good base had formed at the bottom. But I had to turn the speed way down to print at smaller layers. More like 50-80mm/s.
Some other issues you might encounter when printed at the intended high speed of 150 mm/s:
- There will come quite a lot of vibration from the printer at those speeds. Make sure whatever you have it on is stable. You might also have issues with long thin objects that can start to vibrate at the top, leading to messed-up results. Good brim/skirts at the bottom can help, but I found it to be an issue on some prints.
- It can have issues with multiple small objects. It moves so fast from object to object that the vibrations gives you a lot of ghosting.
- When printing long lines where it squirts out a lot of filament, the spool holder can struggle to keep up. It puts pressure on the spool and can lead to some issues.
- Printing overhangs and other hard-to-do stuff, you might need to slow it down a little.
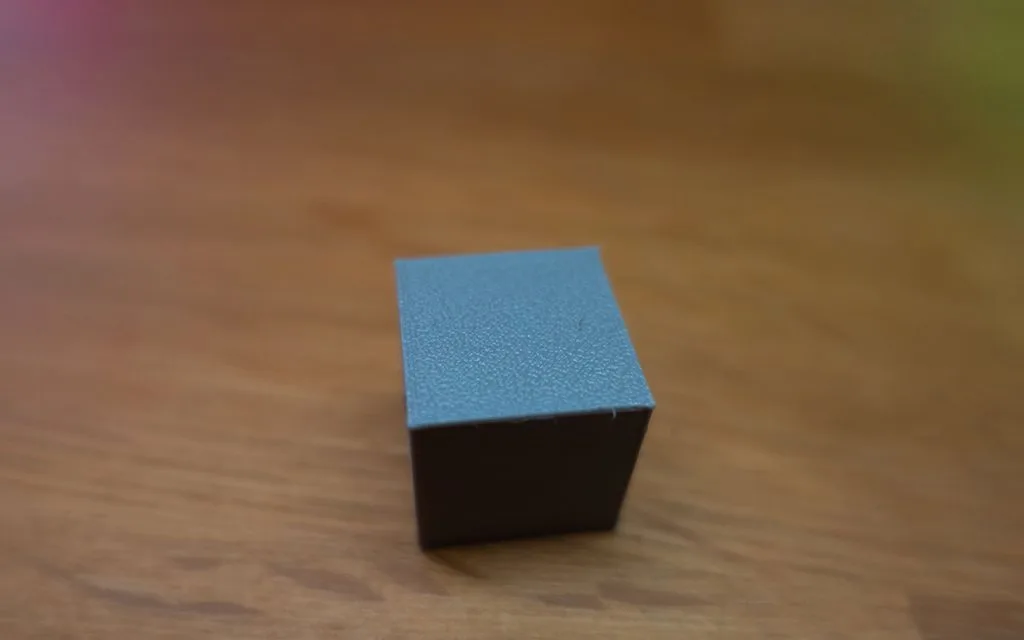
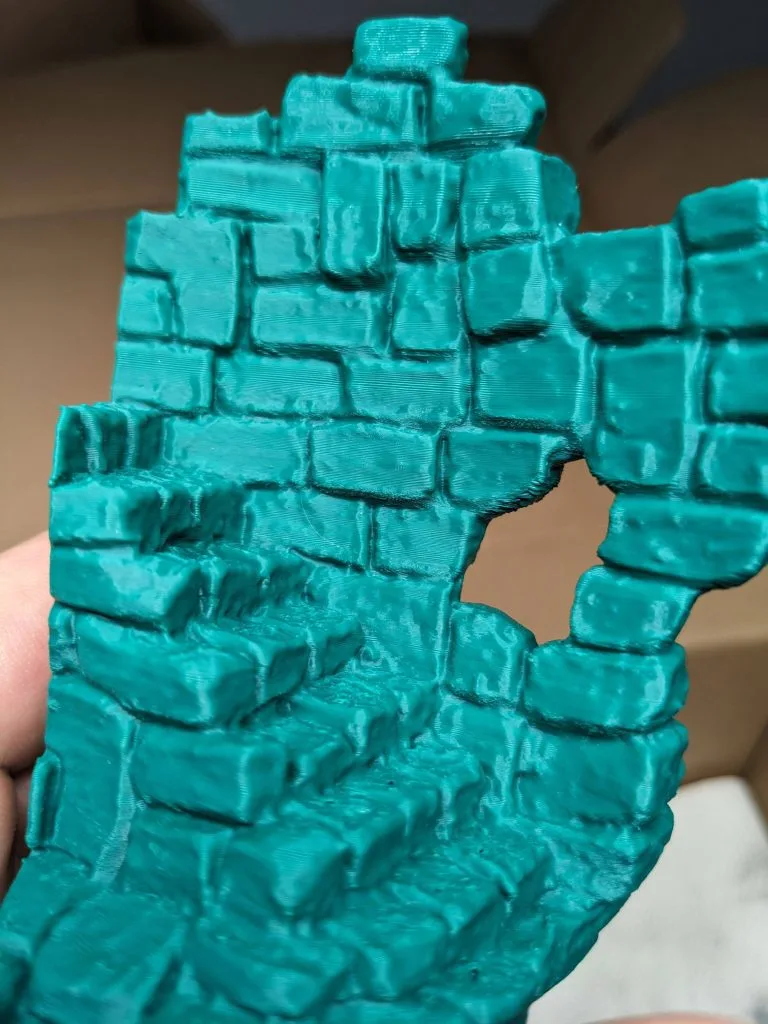
In the end, I succeded in printing a piece of terrain that is okay. It is by no means perfect, but the layer lines are definitely less visible than at 0.2mm. But still, not the greatest. If you are printing terrain that is more blocky, this is less of an issue. But for something like stone, it is not great. Byt maybe you can live with the quality?
Is the Anycubic Kobra 2 the right FDM printer for you?
Overall I am a big fan of what Anycubic has done with the Kobra 2. Things are definitely moving in a direction where manufacturers are trying to bring down the pain points of new adapters, instead of just focusing on making the cheapest Ender 3 clone. The out of box experience is okay, but could certainly be improved by thinking the process of a new user from start to end all the way through. Little things get in the way of this printer experience being great.
I cannot shake the feeling that the printer and the ecosystem around it have not been thought out all the way. While Anycuibc now has profiles for Cura and Prusa, that was not the case for people that preordered the printer. Machines should ship with that sort of stuff. The same thing can be said for the way the start and stop code of the machine is.
The hardware seems to be able to hold up to the speed of the printer, which is otherwise something that can quickly wreck a printer (try printing fast on printers with rubber wheels all over and you will quickly see them degrade).
I also think this a printer that you will not regret buying when a new machine generation comes out, because it is unlikely to have big improvements over it. The printer runs so fast that we are starting to have some real struggles with physics here (how fast the filament flow, can you actually cool the filament in time and so on).
The Kobra 2 has great potential, but I would like Anycubic to help new people explore it to its fullest potential with better UX (on the machine and off the machine).

As always I need to mention this: do not trust the marketing. So much of it is hype bullshit (5x times faster, save % of time and so on). It is a good machine, but the numbers they provide are not the whole truth.
What I really like about the Kobra 2
Works out of the box for 0.2mm layer height with PLA
Very fast and good print quality when working with 0.2mm layer heights or above
A budget pick that will be a good first 3D printer
Has the hardware to do the speed without degrading very quickly
Direct drive hot enough to print a broad range of filaments
Good PEI magnetic bed that makes printing easier
I do not like about the Anycubic Kobra 2:
The UI gives you very limited control directly to the printer and there are some general user experience issues
Weird design decisions (left side spool holder, placement of power and SD slot)
Bad start and end g-code that does not utilize all of the printers features
The nozzle is not a standard-sized nozzle (making it hard and more expensive to get replacements)
Runs Marlin and not Klipper (mainly an issue for people who mod their printers)
The best thing I can say about the Anycubic Kobra 2 is that it made me reconsider FDM printing. I have been reluctant to jump back into this space, as it has just been too fiddly and cumbersome to do for myself or to recommend to anybody in the miniature space that did not like tinkering for ages with machines. I mean, if you are in the miniature hobby you likely do not need more hobbies to take up your time!

The Anycubic Kobra 2 was easy to set up and get started printing that it made me want to FDM print terrain, props for DnD, a Blood Bowl stadium, and other kinds of things that are just not feasible to do in resin. What’s more, it printed so fast that it was actually fun again!
For that, it gets my recommendation for people that just want a printer to print stuff at 0.2mm, without worrying too much with fine-tuning detail or doing a lot of tinkering with the machine.
If you do like to get in deep with modding your machine, calibrating to the finest detail and having full control, this is likely not for you.
Would I recommend the Kobra 2 for complete beginners? It depends. If I knew the person would be somewhat tech savvy and be able to fine tune it a bit, I would say yes. If the answer was no, I would recommend getting a printer there is even more easy to use and hands-off.
- Works out of the box pretty well
- Fast and precise for most needs
- Very budget-friendly
- Limited control of printer via UI and UX issues
- Extremely Noisy
- Limited build volume
- Questionable design decisions
Anycubic Kobra 2 Review: Did it live up to my expectations?
So to reiterate, this is what I expected from the Kobra 2:
- For the auto bed leveling to work, but also maybe not really at all
- For the stock settings to be almost useless
- That I should use +30 hours adjusting slicer settings to be able to print at a low layer height without issues
For 1 and 2 the Kobra 2 far exceeded my very negative expectations. I was pleasantly surprised that the leveling actually worked and that I could print out of the box. With regard to 3, it was as I feared.
The UX on the machine is not set up for tuning the printer, so I had to use Pronterface to adjust e-steps and the slicer to tune z-offset exactly. Even then, when running at high printing speed it messed up the models I tried to print at 0.04 or 0.08. So the Kobra 2 did not end up being my go to recommendation for beginners wanting to 3D print terrain. It is just not easy enough to use for that.
So yeah, let us look at alternatives.
Alternatives to the Anycubic Kobra 2
Now the Anycubic Kobra 2 is not the only fast, easy to use FDM printer. This is the new “hotness” in FDM printing, so more and more manufacturers are making printers like this. But when comparing printers price is a key factor to determine which is best for you.
As of writing, the best price I have seen the Anycubic Kobra 2 for is $259 (as with most 3D printers, buy on a sale and buy directly from the manufacturer for the cheapest price). For a 3D printer with this kind of hardware, that is pretty cheap. But I think to get a better and more easy to use experience you will likely need to pay more.
Elegoo Neptune 4

The Elegoo Neptune 4 is in many ways very similar to the Anycubic Kobra (size, hardware and price). The Neptune runs Klipper firmware instead of the Marlin software the Anycubic runs. For beginners, the Marlin is great. If you want to get really into this kinda stuff in a nerdy way I would get the Neptune instead.
Prusa MK4

I got nothing bad to say about Prusa other than the price is insanely premium. But if you need a lot of hand-holding on your first jump into FDM 3D printing, I would strongly recommend them and the Prusa MK4.
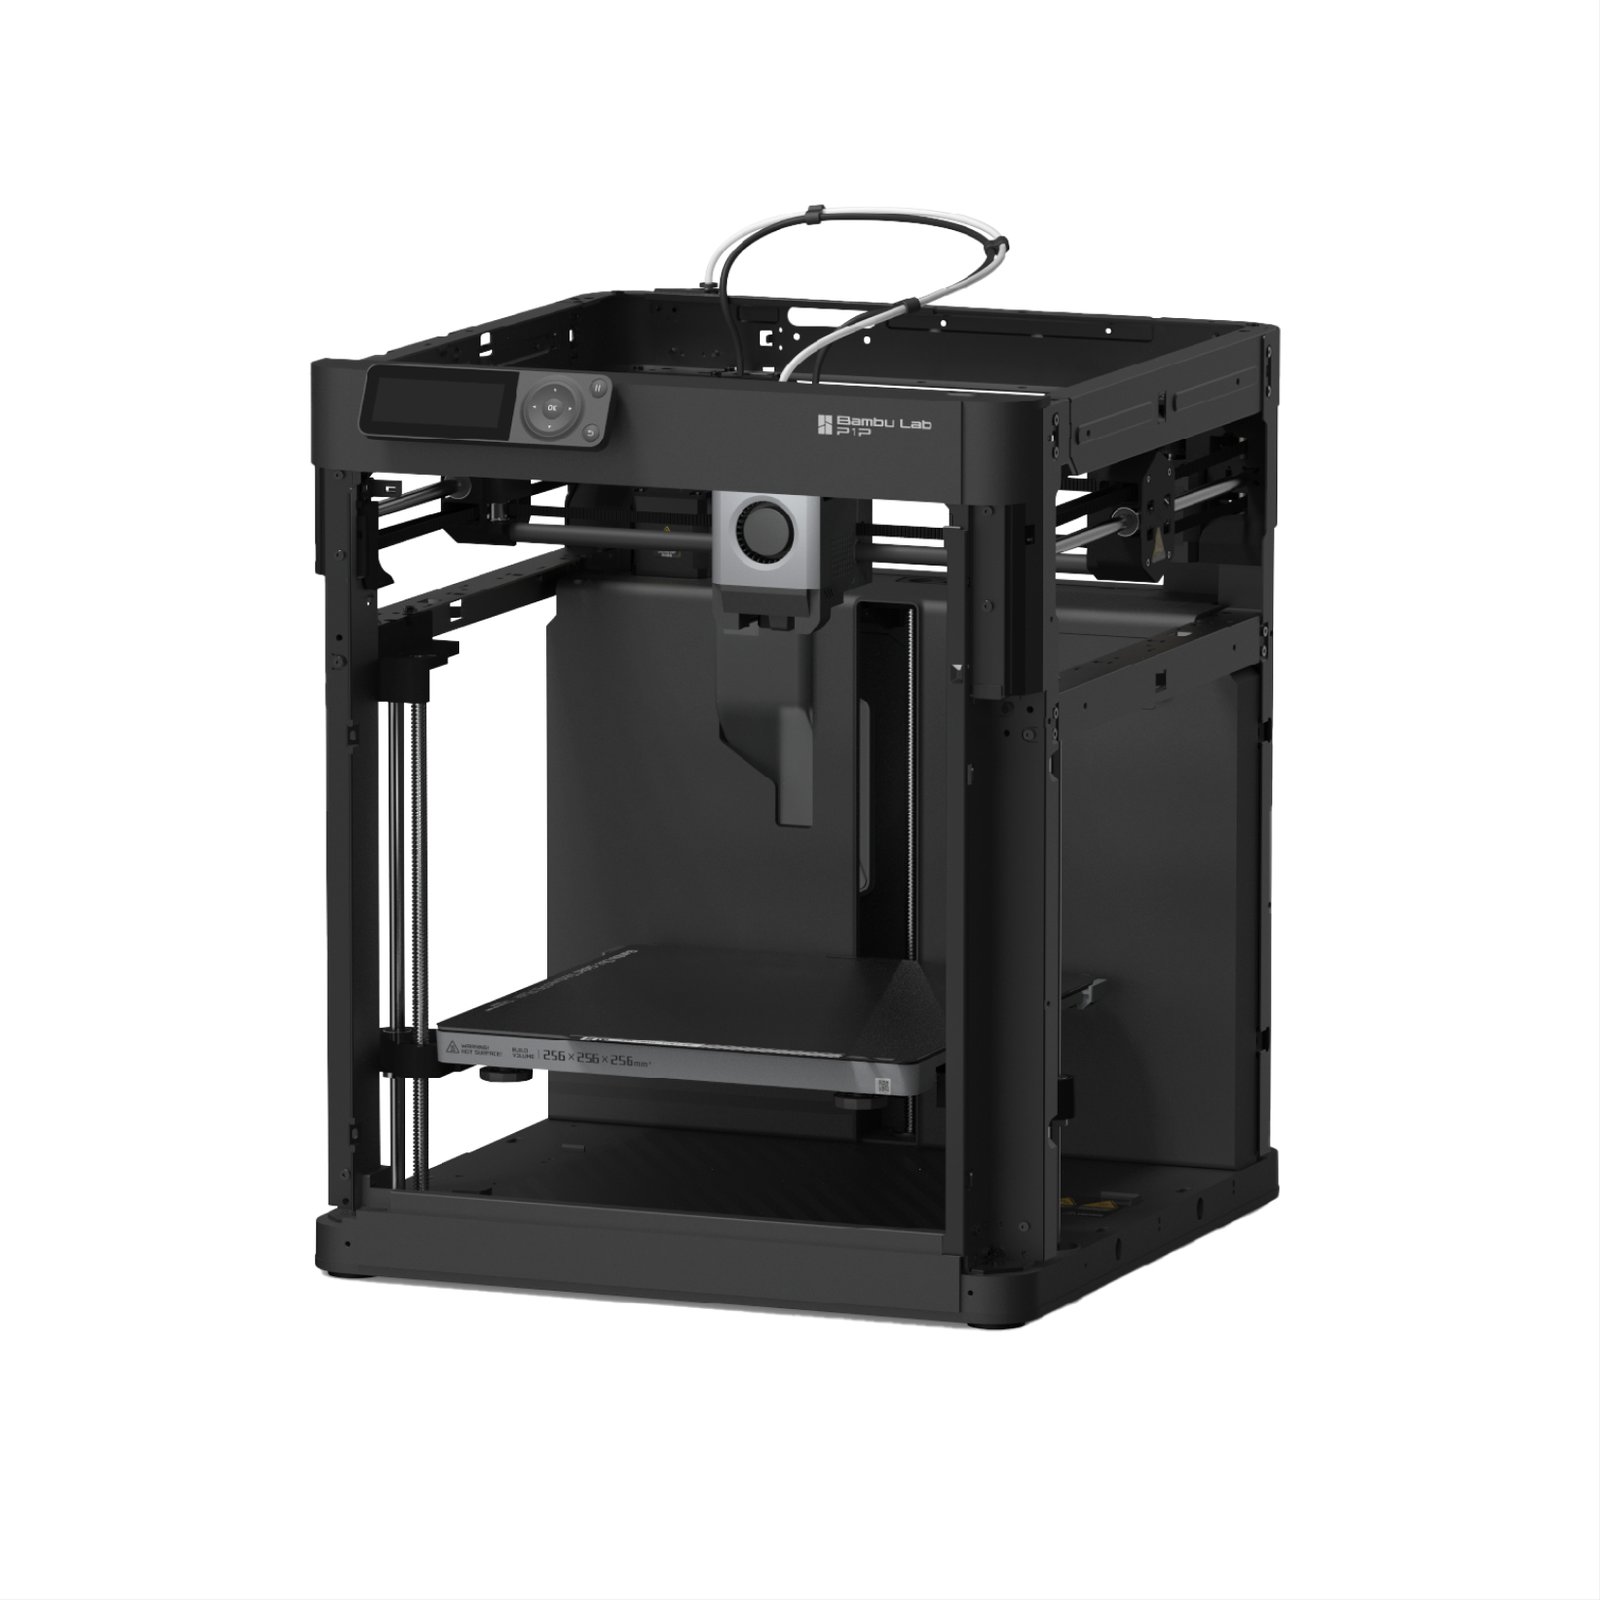
Bambu Lap P1P
- Very easy to use
- Extremely fine tuned out of the box
- Can print amazing quality at very high speeds
- Branded slicer that is actually good
- Cloud and Wifi integration that now (mostly) works
- Ancient UI on the printer itself
- Build with proprietary parts
- Very noisy
- Data privacy issues and cloud breakdowns
If you are looking for even more ease of use, a default speed that is insanely fast, and has nice features you could look at Bambu Lap’s amazing printers. The cheapest entry is the P1P, but it should be more than capable (if you are into multicolor printing, the P1S is likely better).
You can read my review of the Bambu Lab P1P here.
I see Bambu Lab like I see Apple. For the price of all your data and a proprietary system, you get ease of use and something that just works. But man, this machine just works.
Creality K1

Another expensive enclosure machine, this time from Creality. The K1 is super fast and easy to use, but man do they cost some money these premium machines.